


In my limited memory (a key factor) I find it better to just dedicate the focused time to get it done all at once. Projects that sit have issues with parts and fasteners getting moved, stuff like that. I end up with a laydown table with parts in order of disassembly, blue tape to hold fasteners in original positions if they aren't obvious, and for labels for electrical connectors and wiring, plastic dish trays, magnetic parts trays, etc. Lots of pictures. I sometimes wish I had a GoPro or similar to leave in a convenient place so it could save some narration during disassembly.
My first timing belt project had three video cameras running. Initially thought I'd do a tech video, but ended up with way too many hours to edit, especially after a lot of do-overs to get video of the right way to do something. But... There were some reassembly steps that needed some re-looks at the video to get things back together just right. I can do the job in my sleep now, but still follow the checklist/procedure religiously every time.
And a reminder -- the cars were designed to be easy to assemble on the factory production line. Somebody put it together originally, passing a mostly-assembled dash in from one side to a helper who placed it and helped bolt it in and plug it in and plumb it in. Having the replacement dash there means you can find all the fastener locations before you even open the door into the car.
Then there's the WYAIT factor:
The danger (or opportunity) with the whole dash out is that you can easily service the HVAC components while you are in there. Age-related deterioration afflicts vacuum actuators/diaphragms, and the diverter and blend door seals inside the airboxes. That black dust around the vent openings was a nice soft closed-cell foam seal when the car was built 35 years ago. The crispy corrugated hoses to the vent openings wasn't crispy. You wanted to hide some power wiring for your radar detector and dash cam, plus that charging cradle for your phone. Now's the time.
Dash removal
-
dr bob
- Moderator
- Posts: 651
- Joined: Thu Jul 08, 2021 9:30 pm
- Location: Central Oregon
- Has thanked: 264 times
- Been thanked: 259 times
dr bob
1989 928 S4, black with cashmere/black inside
SoCal 928 Group Cofounder
928 Owner's Club Charter Member
Former Ex Bend Yacht Club Commodore Emeritus
Free Advice and Commentary. Use At Your Own Risk!
1989 928 S4, black with cashmere/black inside
SoCal 928 Group Cofounder
928 Owner's Club Charter Member
Former Ex Bend Yacht Club Commodore Emeritus
Free Advice and Commentary. Use At Your Own Risk!
-
Thom

- The First Carpoke!
- Posts: 578
- Joined: Sat Jun 26, 2021 2:31 am
- Has thanked: 140 times
- Been thanked: 156 times
Just as a FYI, there are no vacuum actuators on 944s like on 928s. I remember investigating on an '87 S4 why it would blow hot air no matter what and it was down to a sheared membrane on one of the (4?) actuators but thankfully the HVAC system on oval dash 944s is far more modern and doesn't suffer from these issues or at least on a far lower scale.
Last edited by Thom on Fri Nov 26, 2021 11:47 am, edited 1 time in total.
'90 944 turbo
-
Tom

- Site Admin
- Posts: 9098
- Joined: Fri Jun 25, 2021 2:04 pm
- Location: Silicon Valley, CA
- Has thanked: 952 times
- Been thanked: 4085 times
- Contact:
My old 450SL is much like a 928 in a lot of ways, including the CIS v8, but it also has hvac vacuum pods stuffed in there so high and tight that you need to pull the dash for all practical purposes. I had 'a guy' change them all and the heater core when we redid the interior with dash out. Half of them were NLA. We managed to find all but one sitting on shelves around the world, but one of them had to be made. There is a little cottage industry of guys who make pods for old cars -- go figure. As for the electrically-controlled 951 hvac systems, as best I know, the diagnostic charts I did last year are the only ones available on the web...
https://carpokes.com/viewtopic.php?f=4& ... =hvac#p105
https://carpokes.com/viewtopic.php?f=4& ... =hvac#p105
-
dr bob
- Moderator
- Posts: 651
- Joined: Thu Jul 08, 2021 9:30 pm
- Location: Central Oregon
- Has thanked: 264 times
- Been thanked: 259 times
Porsche was building Mercedes muscle-coupes under contract for a while. I'm sure there was a lot of knowledge transfer during that little episode, and it may have opened Porsche's eyes to the possibilities of the front-engine water-cooled cars. The designers and engineers pools were undoubtedly shared between Porsche and M-B as the fortunes of the two companies see-sawed in the early 1970's, and their knowledge walked to "the other side" with them.
Meamwhile... it was teams of small ergo-gnomes who designed the dashes and controls.
Meamwhile... it was teams of small ergo-gnomes who designed the dashes and controls.
dr bob
1989 928 S4, black with cashmere/black inside
SoCal 928 Group Cofounder
928 Owner's Club Charter Member
Former Ex Bend Yacht Club Commodore Emeritus
Free Advice and Commentary. Use At Your Own Risk!
1989 928 S4, black with cashmere/black inside
SoCal 928 Group Cofounder
928 Owner's Club Charter Member
Former Ex Bend Yacht Club Commodore Emeritus
Free Advice and Commentary. Use At Your Own Risk!
-
Tom
- Site Admin
- Posts: 9098
- Joined: Fri Jun 25, 2021 2:04 pm
- Location: Silicon Valley, CA
- Has thanked: 952 times
- Been thanked: 4085 times
- Contact:
Last week was tough for unrelated reasons, so I didn't spend much time in the garage -- but any day now I'm going to get going on it I swear. The leather dash is sitting in its box next to the car as a constant reminder....
- 7B993B42-F951-4E39-A548-2B7A83A3F3FC.jpeg (735.99 KiB) Viewed 2069 times
Better late than never. I have not put either dash back in.Tom wrote: Thu Oct 28, 2021 1:20 pmThat would be great. I have an old write up someone did in like the 90's, complete with genuine Polaroid pictures!gruhsy wrote: Thu Oct 28, 2021 12:47 pm I will try and remember to post pics later after work
I have pulled 2 dashboards
An 87 then an 86
And did you get them both back on
Most pics are post dash removal. I am still searching for my during removal pics.
A bunch of the pics haven’t loaded…..working on it.
- Add Pictures/Files
-
- A6F5337B-6E0C-4E0F-AE07-D4A4DD903F7B.jpeg (530.34 KiB) Viewed 2068 times
-
- BF2F3283-75FA-48BB-A796-B20FD3CF738A.jpeg (3.04 MiB) Viewed 2069 times
-
- C825C5D3-689C-4008-9B08-B68097C484BA.jpeg (2.65 MiB) Viewed 2069 times
-
- 40AFD582-9AB8-4C0E-92A1-1C70B2AFC841.jpeg (1.05 MiB) Viewed 2069 times
-
- B27D522B-0547-42C7-9B73-768BC5A5393B.jpeg (550.2 KiB) Viewed 2069 times
-
- C9AF16C6-E415-4663-87E5-BD231124445C.jpeg (2.84 MiB) Viewed 2069 times
-
- 9BAAF07E-27F2-4785-98D9-916B065BE656.jpeg (1.8 MiB) Viewed 2069 times
-
- C0EDD26F-09C6-43AC-9C26-F59FE901E6C0.jpeg (1.89 MiB) Viewed 2069 times
Last edited by gruhsy on Sat Nov 27, 2021 9:59 am, edited 1 time in total.
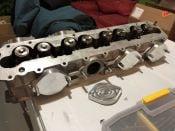
More pics with dashboard removal.
- Add Pictures/Files
-
- E5794359-F2A7-42C0-8C48-E7ED537044F3.jpeg (3.63 MiB) Viewed 2065 times
-
- 0515C1F5-4B9B-4467-8868-7F287BC31680.jpeg (3.48 MiB) Viewed 2065 times
-
- F0BA7827-176F-4377-A1A5-0CA23BBCA270.jpeg (2.73 MiB) Viewed 2065 times
-
- DCDA1739-F1EE-4DE3-844F-639F57888B65.jpeg (3.27 MiB) Viewed 2065 times
-
- 56686FB3-B958-4A06-9E5A-CA98D87C8AE3.jpeg (3.9 MiB) Viewed 2065 times
-
- BC6496D1-7E39-4E19-9383-A38B099C760A.jpeg (3.22 MiB) Viewed 2065 times
-
- E5729284-CA9E-49B3-8937-67332FEA6551.jpeg (2.74 MiB) Viewed 2065 times
-
- 70F2CA72-8443-4DA0-8DC6-221176252B20.jpeg (2.86 MiB) Viewed 2065 times
-
- 70981EB5-1471-4344-BAAB-4694E9A7ED11.jpeg (3.07 MiB) Viewed 2065 times
-
- F6E5D8A2-032C-4B1F-98F2-1478604700A3.jpeg (2.65 MiB) Viewed 2065 times
-
Tom
- Site Admin
- Posts: 9098
- Joined: Fri Jun 25, 2021 2:04 pm
- Location: Silicon Valley, CA
- Has thanked: 952 times
- Been thanked: 4085 times
- Contact:
Wow, thanks for all those pictures. My goal is to do a detailed write-up on the process to kick off a new DIY section, but man your pictures are not doing much to motivate me.  Your dash looked good in the before picture. Why did you remove it in the first place, and what's keeping you from putting it back on? Just time and getting around to it, or is there an issue?
I have completely gutted the red 86 and one of my black 87’s…the Rage2 car.
Ultimately I would like to send both of those chassis back to Porsche Classic for a partial restoration.
Body and wiring harnesses and interior color change.
That will be a few years away.
I have a few hundred more photos but it’s kinda slow loading them a few at a time.
Ultimately I would like to send both of those chassis back to Porsche Classic for a partial restoration.
Body and wiring harnesses and interior color change.
That will be a few years away.
I have a few hundred more photos but it’s kinda slow loading them a few at a time.
Tom wrote: Sat Nov 27, 2021 9:54 am Wow, thanks for all those pictures. My goal is to do a detailed write-up on the process to kick off a new DIY section, but man your pictures are not doing much to motivate me.