944 Restoration Progress January 5th - July 30th

Naturally aspirated tech and talk
User avatar
Jacquiles
Posts: 51
Joined: Fri Jul 14, 2023 7:06 am
Has thanked: 47 times
Been thanked: 9 times
A little information about myself. I'm 19 and i Live in West Tennessee. I work at a High end aftermarket automotive audio/electronics shop. I have worked there for a little over 3 years and before that i worked at a local mechanic shop from when i was 15-16. I got my Basic "Mobile Electronics Certified Professional" Certification when i was 16, and just recently got my Skilled Certification. I am currently enrolled in college for mechanical Engineering.

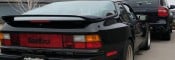
It all started at the very beginning of 2023. I had been casually searching for a project car that i could work on and enjoy driving. My top picks were 3rd gen supra's, and 80's camaro's. I did look at the 944's because one of my friends had one and they seemed pretty cool. I believe it was a maroon 84 model.. At the time, it was a week after Christmas and i was hanging out with some friends before we all went back to college and wouldn't be able to see each other for a while. At one point we went to one of my friends houses and in their garage/basement sat a 1986, black, Porsche 944. It was practically love at first sight. I had seen plenty of pictures of them online but never in person. I immediately started looking up engine models, common problems and the like. It wasn't long after that i was making an offer for that exact one, and a few days later, it was mine.
IMG_0316.jpeg
IMG_0316.jpeg (632.42 KiB) Viewed 1267 times
Shortly after i began my work. When i bought the car it didn't run and had many other things not working. Within the first two weeks of owning the car, only able to work on it on the weekends, i got it running and fixed half of the issues i found at the time.
IMG_0332.JPG
IMG_0332.JPG (665.17 KiB) Viewed 1267 times
69672328292__D50BF44C-EDC7-4140-BBC3-608733A8FBA8.jpeg
69672328292__D50BF44C-EDC7-4140-BBC3-608733A8FBA8.jpeg (1.06 MiB) Viewed 1267 times
IMG_0481.jpeg
IMG_0481.jpeg (966.4 KiB) Viewed 1267 times
I also took it on my first test drive which was exhilarating, although i didn't go above 20 miles per hour. On this drive i found out i had every leak possible. Coolant, oil, and power steering. I spent alot of time debating how much i wanted to fix up this car, but i decided to go all in. All my work on the car had previously been done in our carport, at night, during 30 degree weather. Thankfully at this point my parents let me swap spots with our tractor in our garage.
IMG_0552.jpeg
IMG_0552.jpeg (1.14 MiB) Viewed 1267 times
70216670955__E852683D-121F-49CF-AED8-DD46E2F6B097.jpeg
70216670955__E852683D-121F-49CF-AED8-DD46E2F6B097.jpeg (1.13 MiB) Viewed 1267 times
IMG_1735.JPEG
IMG_1735.JPEG (103.54 KiB) Viewed 1267 times
Because of all the leaks i decided to remove the motor. I ended up replacing every single seal in the motor. Front and rear main seal, valve steams, you name it. I also replaced the rod bearings at this time. I also resealed and cleaned up my power steering pump and rack.
70667300901__4B4FBEBC-F374-40B9-964A-FE03888E66A7.jpeg
70667300901__4B4FBEBC-F374-40B9-964A-FE03888E66A7.jpeg (1.03 MiB) Viewed 1267 times
IMG_1295.jpeg
IMG_1295.jpeg (1.15 MiB) Viewed 1267 times
IMG_1310.jpeg
IMG_1310.jpeg (1.4 MiB) Viewed 1267 times
After spending many grueling hours cleaning every gasket mating surface, and putting it all back together, i finally got my motor back together and back in the car. I also replaced the front ball joints, sway bar bushings, front shocks with koni's(rear already replaced when i bought the car). As well as all the belts and whatnot. New water pump, motor mounts, all new radiator hoses, new vacuum lines(already replaced prior to taking the motor out), clutch and pressure plate + throw out bearing, new used fuel rail, brand new injectors, tie rod ends, front right brake caliper, and new Michelin Pilot Sport 4 all seasons. I also found out that my car even though it is an NA version, it has the turbo phone dials on them, so its a staggered setup.
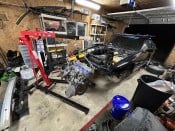
All in all, I've spent just over $5000 on parts, and I'm not quite finished... I will be honest i am quite ready to be done working on it, but i have learned so much along the way. As of right now, I'm in the middle of installing the new front koni struts, still waiting on my right front caliper to arrive(tomorrow 7/31), and just discovered that EVERY SINGLE cv axle bolt is loose. Two of them weren't even threaded in. I also discovered that the locking half moon washers are missing, so when i torqued them down it was near impossible to rotate the rear wheels because of the lack of the washer. The bolts were now long enough to scrape against the inside of the wheel hub housing so now i have to replace all the bolts and find the proper locking plates. After all that is done, is should be able to drive it. Right now the motor runs well and I've flushed all the old coolant and put in new oil and filter. But it's still standing on jack stands and still have the aforementioned issued and parts to install. There are also some minor interior issues to fix, like peeling vinyl, but that will be no problem for me to fix. I also found some interior wiring to fix that has deteriorated but other than that, I'm almost done! Thankfully most of the car is in good shape, my dash is immaculate considering how most are. Only one small crack near at a vent hole. I go back to school on August 22, so I'm hoping to be done with all the big stuff by then. I live in the same town where i go to school so i will still be able to work on it, just much more limited time. There is a lot that i haven't mentioned in here but overall this is the gist of it. Thank you for reading my post if you made it this far! If you have any recommendations, please let me know!
Last edited by Jacquiles on Tue Jun 11, 2024 9:37 am, edited 1 time in total.

#1

User avatar
blueline
Moderator
Posts: 6086
Joined: Mon Sep 26, 2022 12:22 pm
Location: Middle Tennessee
Has thanked: 4435 times
Been thanked: 2409 times
@Jacquiles

Fantastic story!! Impressive that you undertook a project of that magnitude and made that kind of progress in such a short time. Nice! Thanks for all the details and pictures - you're perseverance and knowledge is awesome.

On top of all of that, it appears that you'll have it running and ready to go by school start which will be another milestone in your extensive restoration project - another nice reward. The future is indeed bright!
Tim
Current:
'26 911 Carrera S - PTS Verde British Racing Green
'24 Cayenne S - Algarve Blue Metallic
'21 718 Cayman GTS - Black
'22 911 Turbo S - Carmine Red
'21 718 Cayman GT4 - White
'11 GMC 1500 Quad Cab 4x4 - Black

Musik-Stadt Region

#2

User avatar
Tom
Site Admin
Posts: 8913
Joined: Fri Jun 25, 2021 2:04 pm
Location: Silicon Valley, CA
Has thanked: 931 times
Been thanked: 3988 times
Contact:
Wow, that's a ton of work in a short time and super impressive to take all that on, and get it done on your own, at 19. At 19, I would spend hours trying to get the 'points' adjusted in my 1977 Toyota Corolla. ;) Can't wait to see the finished product! If you have not replaced the under-hood fuel lines, that's a must as these cars age, since they become a real fire risk. Assume you did the timing belt too. Keep us posted on your progress and feel free to ask any questions that pop up. We have lots of collective 944 knowledge here without any snark to go with it. :) Welcome aboard!

#3

User avatar
Larry C
Posts: 1655
Joined: Wed Aug 04, 2021 6:56 pm
Location: Los Angeles
Has thanked: 592 times
Been thanked: 667 times
Very good read and impressive story! Please keep us updated on your build progress. ‘Can’t wait to hear your driving impressions once the car is on the road.
Best,
Larry
2022 Cayman GTS 4.0
2019 Audi RS3 (sold)
2016 VW Golf R (sold)
2013 Audi S4 (sold)

#4

ROB III
Moderator
Posts: 598
Joined: Fri Mar 25, 2022 2:47 pm
Location: Nashville
Has thanked: 520 times
Been thanked: 261 times
Welcome to CARPOKES and the world of Porsche and specifically the transaxle group. Once you get up and running, you might want to look down the list of entries of the 924/944/968 boards to 2.8L N/A 318hp Build Recipe written by Michaelmount123 for engine possibilities. You might also peruse the 944 Turbo posts just to see what is possible. Your drive and energy as seen by what you have done in such a short period of time is inspirational. Thank you for joining and sharing.
Rob
89 944 Turbo
Musik-Stadt Region

#5

User avatar
Jacquiles
Posts: 51
Joined: Fri Jul 14, 2023 7:06 am
Has thanked: 47 times
Been thanked: 9 times
Tom wrote: Mon Jul 31, 2023 8:08 am Wow, that's a ton of work in a short time and super impressive to take all that on, and get it done on your own, at 19. At 19, I would spend hours trying to get the 'points' adjusted in my 1977 Toyota Corolla. ;) Can't wait to see the finished product! If you have not replaced the under-hood fuel lines, that's a must as these cars age, since they become a real fire risk. Assume you did the timing belt too. Keep us posted on your progress and feel free to ask any questions that pop up. We have lots of collective 944 knowledge here without any snark to go with it. :) Welcome aboard!
Thankfully when i bought the car, it came with a lot of extra parts and one of them was a kit for replacing the old rubber fuel lines. although they were not installed when i got the car. But that was one of the first things i fixed after getting it. Timing belt is done aswell 👍🏻

#6

User avatar
DMRK
Posts: 69
Joined: Tue Sep 27, 2022 3:57 pm
Has thanked: 21 times
Been thanked: 38 times
Congratulations on your project. Looks like you are well on your way to driving it very soon. Great job!

#7

SE_944ER
Posts: 31
Joined: Sun Jun 18, 2023 8:07 am
Has thanked: 9 times
Been thanked: 4 times
Hi Guys,
Sorry if I'm intruding, but can I get help in sorting out an issue here. I've all the belts and accessible seals replaced in the last few weeks. But when all was put back and started the car, the timing belt is slapping to the rear timing cover, a bit violently.

Could this be because the timing belt is too loose? Or did I miss something else? :?:
Please assist. :cry:
VID-20230816-WA0006.zip
(3.37 MiB) Downloaded 84 times
Couldn't add the video file directly here, hence zipping.
Regards,
SE_944ER
---------------
1987 944 S

#8

User avatar
Tom
Site Admin
Posts: 8913
Joined: Fri Jun 25, 2021 2:04 pm
Location: Silicon Valley, CA
Has thanked: 931 times
Been thanked: 3988 times
Contact:
SE_944ER wrote: Wed Aug 16, 2023 11:40 am Hi Guys,
Sorry if I'm intruding, but can I get help in sorting out an issue here. I've all the belts and accessible seals replaced in the last few weeks. But when all was put back and started the car, the timing belt is slapping to the rear timing cover, a bit violently.

Could this be because the timing belt is too loose? Or did I miss something else? :?:
Please assist. :cry:

VID-20230816-WA0006.zip Couldn't add the video file directly here, hence zipping.
Looks loose. You previously said you modified the 3D printed tension tool 'a bit drastically' to fit the S motor. My guess is the modifications threw off its readings -- that does look way too loose and shouldn't be hitting the cover like that. If you show a pic of your modifications to the tool, I might be able to put my finger on the issue. It's dependent on that pivot point boss to work right. Any changes to how/where it rotates would need to be checked/calibrated against the factory tool.

#9

SE_944ER
Posts: 31
Joined: Sun Jun 18, 2023 8:07 am
Has thanked: 9 times
Been thanked: 4 times
Tom wrote: Wed Aug 16, 2023 11:58 am
SE_944ER wrote: Wed Aug 16, 2023 11:40 am Hi Guys,
Sorry if I'm intruding, but can I get help in sorting out an issue here. I've all the belts and accessible seals replaced in the last few weeks. But when all was put back and started the car, the timing belt is slapping to the rear timing cover, a bit violently.

Could this be because the timing belt is too loose? Or did I miss something else? :?:
Please assist. :cry:

VID-20230816-WA0006.zip Couldn't add the video file directly here, hence zipping.
Looks loose. You previously said you modified the 3D printed tension tool 'a bit drastically' to fit the S motor. My guess is the modifications threw off its readings -- that does look way too loose and shouldn't be hitting the cover like that. If you show a pic of your modifications to the tool, I might be able to put my finger on the issue. It's dependent on that pivot point boss to work right. Any changes to how/where it rotates would need to be checked/calibrated against the factory tool.
Hey @Tom,

Please have a look at the tensioner check tool. Even though it is modified I don't think its features are affected. It's all the same. And sorry for the extra big screws.

As you see, the modification is limited to creating space for the extra support on the cam rear cover to not block the tool movement and adding a plastic sleeve for the M6 long bolt to let the tool freely spin. So that its still centered and does not change the calibration.

Is it possible for you to re-design the tool for 944S/S2 models?
img1243.jpeg
img1243.jpeg (163.73 KiB) Viewed 1086 times
img1242.jpeg
img1242.jpeg (140.28 KiB) Viewed 1097 times
Regards,
SE_944ER
---------------
1987 944 S

#10

Post Reply