
OK, next steps.
Readying the car for paint protection film (or PPF) on the hood means dealing with the tiny little chips from the 10,000 kms I've put on the car. It's somewhat surprising to me, the number that there are. My S2000 had a few more, but it was 20 years old. Must be something to do with the angle of the hood, thickness of the clear coat, etc, etc, I guess, but suffice it to say, there are enough tiny spots that I want to deal with them before the whole thing gets protected with a plastic layer.
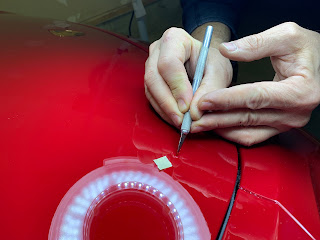 Luckily, my GTS Chronicles compatriot had the same experience, and between the two of us (him doing the lion's share of the work because we've started with his car in his excellent garage), we've worked out a process for filling, smoothing and basically making those tiny chips as close to invisible as we can. We've worked out a combination of chip filling, with tiny pinpricks of Carmine Red paint (from Dr. ColorChip) and the dissolving solution that comes with the paint, some polishing, and for the very worst offenders, a tiny bit of wet sanding.
It was a bit nervy at first, but luckily there was a chip on the inside door frame (where the seatbelt buckle had gotten trapped between the door and the jamb at one point in Europe. It was by far and away larger than anything on either of our hoods, so we used it as a full test spot for going as far as wet sanding - which is unnerving because of the hazing it introduces into the clearcoat. You look at it and think "I've just turned a small chip into a large finely scratched area that looks worse than the chip!" But, as it turns out, you can trust the process and the fact that some light fine cut polishing after sanding completely removes the hazing and makes the sanding marks completely disappear. Phew.
 With the Cayman's hood done, it's time to turn the attention to the Boxster. I've done all the polishing needed to clean the surface, so next up is marking where all the chips are that need touching up. Believe me, you need to do this, because as you go along, you start not being able to tell which ones you've filled vs dissolved vs sanded vs polished. And by the end of the process, some of them really, truly have disappeared!
We also tested a piece of PPF just to see whether or not it was necessary to top the paint chip with a layer or clearcoat (it isn't). The PPF actually hides a good degree of the fine scratches and chips as well - makes sense if I think about it, because once PPF'd, light is reflecting off the PPF and not the clearcoat, so if the PPF is smooth, then those fine scratches disappear because they are NOT reflecting the light. Clever stuff and it means that one doesn't need to be quite so picky about polishing out every, single flaw.
Just get the chips filled with colour, get them smooth, and then get the PPF on!
Both cars are booked into get the film applied. It's pretty finicky to do tricky shapes and the hood is a major panel that is front and centre (literally and figuratively!) so we are going to have the pros do that and the tricky-shaped rocker panels. We're confident we can tackle ourselves the small area behind the rear wheels that we also want to do.
Roll on springtime!
~ Luke